Developer Command Prompt for Visual Studio
It's usual challenge for developers who work on Visual studio project 2008, 2010, 2013, 2015, 2017, 2019- how to open command prompt?.
Developer Command Prompt for Visual Studio enables you to use .NET Framework tools more easily.
As a normal user, you want to open command prompt for Visual Studio 2017
This is what we do - "Start window and search for developer command prompt 2017" - no where find the command prompt as image shown below. As below image showing only for visual studio 2008, this is the root cause-so now how do I open Visual Studio 2017 command prompt window?
Root Cause
Search in Different Operating System
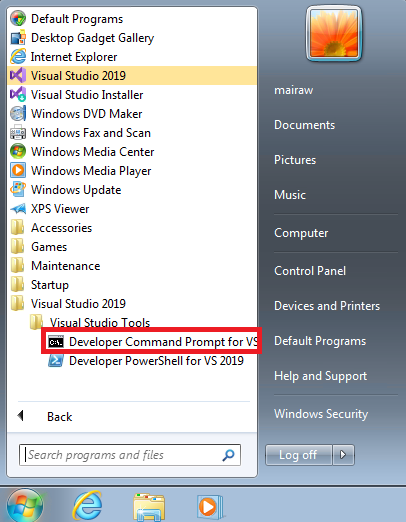
Windows 7
- Choose Start and then expand All Programs.
- Choose Visual Studio 2019 > Visual Studio Tools > Developer Command Prompt for VS 2019, or the command prompt you want to use.

Windows 8.1
- Go to the Start screen, by pressing the Windows logo key
 on your keyboard for example.
 - On the Start screen, press Ctrl+Tab to open the Apps list, and then press V. This brings up a list that includes all installed Visual Studio command prompts.
- Choose Developer Command Prompt for VS 2019 (or the command prompt you want to use).
Windows 10
- Select Start
 and scroll to the letter V.
 - Expand the Visual Studio 2019 folder.
- Choose Developer Command Prompt for VS 2019 (or the command prompt you want to use).Note : The above root cause image in this article was taken windows 10 Operating System, sometime you may not find the folder in windows search.
How manually locate the files on your machine ?
Always, the shortcuts for the command prompts you have installed are placed at the Start Menu folder for Visual Studio
For, Visual Studio 2017
1. Go to windows start 

2. Go to Run command (Windows +R )
3. Type %ProgramData%\Microsoft\Windows\Start Menu\Programs\Visual Studio 2017\Visual Studio Tools
For, Visual Studio 2019
1. Go to windows start 

2. Go to Run command (Windows +R )
3. Type %ProgramData%\Microsoft\Windows\Start Menu\Programs\Visual Studio 2019\Visual Studio Tools
But if, for some reason, searching for the command prompt doesn't produce the expected results, you can try to manually locate the shortcut on your machine.
Try searching for the name of the command prompt file, such as VsDevCmd.bat, or go to the Tools folder, such as %ProgramFiles(x86)%\Microsoft Visual Studio\2019\Community\Common7\Tools (path changes according to your Visual Studio version, edition, and installation location).
This is how the folder looks like , as numbers rounded 1 is folder path , 2 is command prompt bat file
How do I start adding the command prompt inside Visual Studio ?
For easier access, you can add Developer Command Prompt, or any other command prompt, to the Tools menu in Visual Studio. To make the tool available, add it to the external tools list. Here are the steps:
- Open Visual Studio - menu bar, choose Tools > External Tools.
- On the External Tools dialog box, choose the Add button. A new entry appears.
- Enter a Title as Command Prompt
- In the Command field, as
%comspec%orC:\Windows\System32\cmd.exe. - In the Arguments field, specify where to find the specific command prompt you want to use, such as
/k "C:\Program Files (x86)\Microsoft Visual Studio\2017\Community\Common7\Tools\VsDevCmd.bat". - In the Initial directory field, specify the directory in which the command prompt will start. Choose a value such as Project Directory by selecting the arrow next to the field shown in below image -as $(ProjectDir)
- Choose the OK button.
As a result, you will find your new menu item "Command Prompt" added to visual studio project menu
Summary
This article is referred from Microsoft knowledge repository and explains in simple way of how to find visual studio command prompt manually and different operating system folder location and then adding shortcut menu in Visual studio project.


1 Comments
Thank you
ReplyDelete